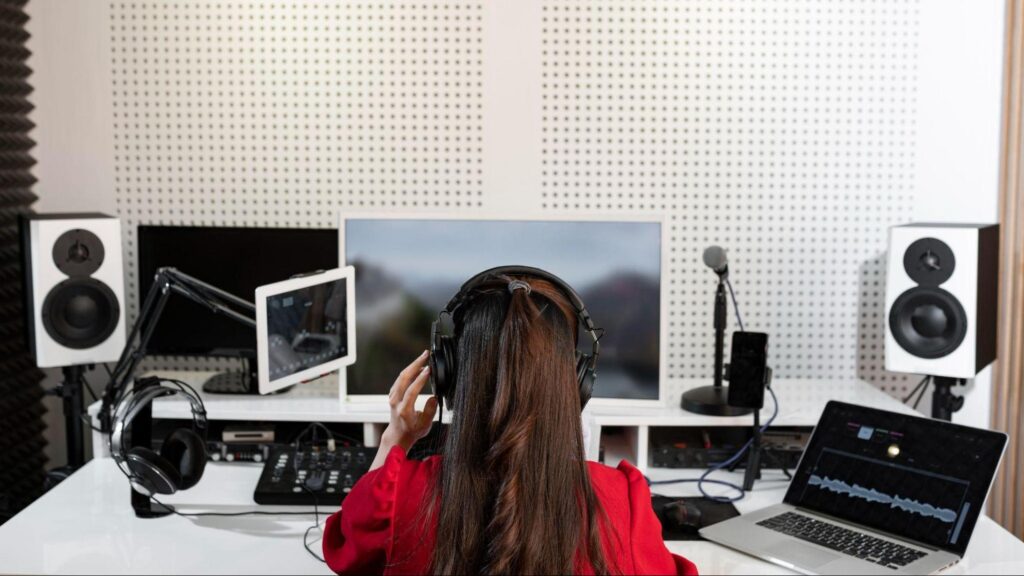
Most professional recording studios began as home studios. We are going to tell you how to create your first Home Studio, beginning with a basic kit with instructions on where and how to install each component of the kit.
What is a home studio?
As its name indicates, it is a studio located inside a house. It is usually located in a bedroom reconverted into a space for audio recording and producing, although some even dare to do mixing in there.
Why build a home studio?
It is important to have the adequate setup and basic acoustic conditioning so that your recordings are clean, free of reverberation and that the sounds that result from the dimensions or proportions of the room do not ruin your productions just by not being properly treated. In order to get your tracks sounding right, your home studio needs a good balance in the absorption of low, mid and high frequencies. Otherwise, we will control only a group of frequencies, but the rest of them will remain elevated, or even intact.
Generally, the hardest frequencies to control in a home studio are the low ones, mainly because of the reduced dimensions of the room and the little available volume of air.
How to set up a home studio
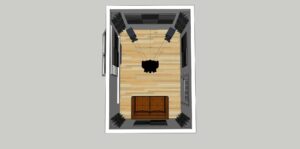
The first thing we’re going to do is to figure out the best orientation for the home studio. If possible, we are going to place the desk in the longest vector of the room, so that the walls that are closest to each other cover our left and right sides. In this post we can explain the optimal position for speakers and sweetpoint.
Essential equipment for a home studio
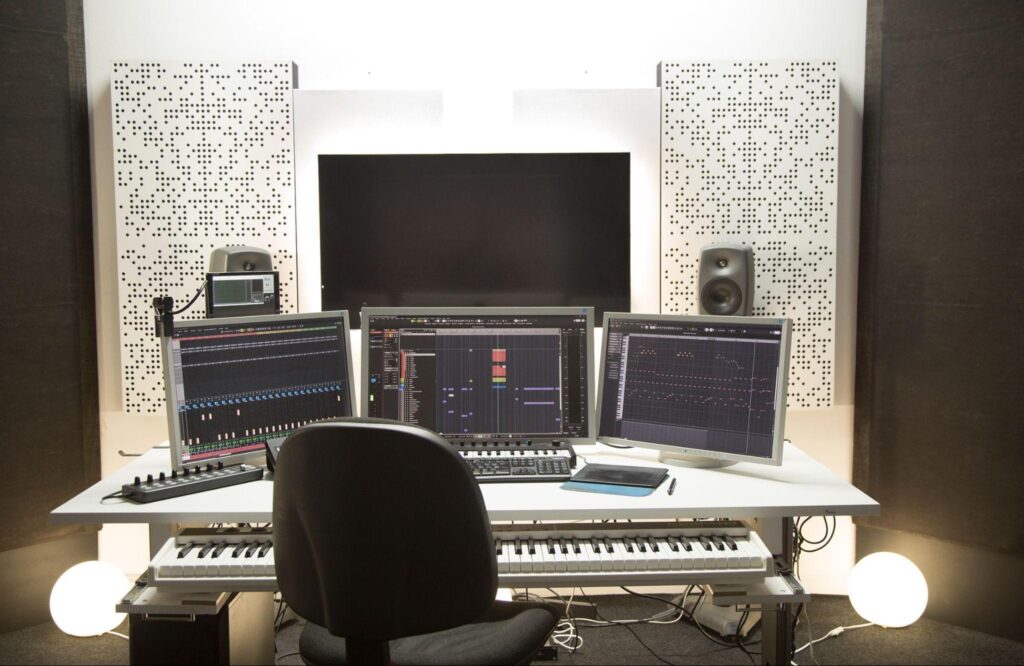
Computer
Apple, Windows or others. This will determine the kind of audio interface you are going to use, although more and more manufacturers have models for each platform or even compatible with both nowadays. There are minimum requirements in every computer depending on the interface, so, if you are planning to buy a new one, think about the compatibility.
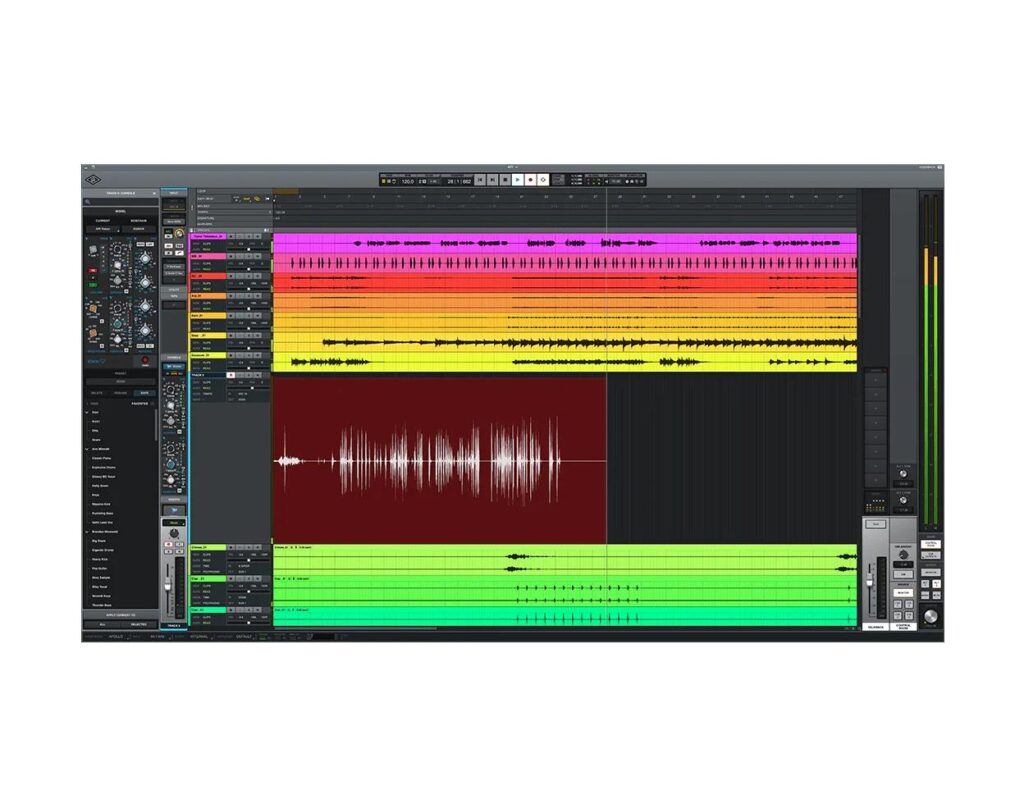
DAW (Digital Audio Workstation)
A DAW is a software that will allow us to record all the instruments, rhythms, voices, etc. in a song, organized in different tracks, as well as adding the style or effects that you wish via the use of hardware or plug-ins. The most common DAWs at a professional level are ProTools, Logic Pro X, Ableton and Universal Audio’s very own LUNA, freely available along with the purchase of any of their audio interfaces and optimized to work with them.
Audio interface
The audio interface has multiple line inputs to connect an instrument using a XLR or jack cable, or maybe a microphone, string instruments, vocals, percussion, etc.
The audio interface carries out an analogic-digital conversion, so that the DAW can record different tracks of digital sound.
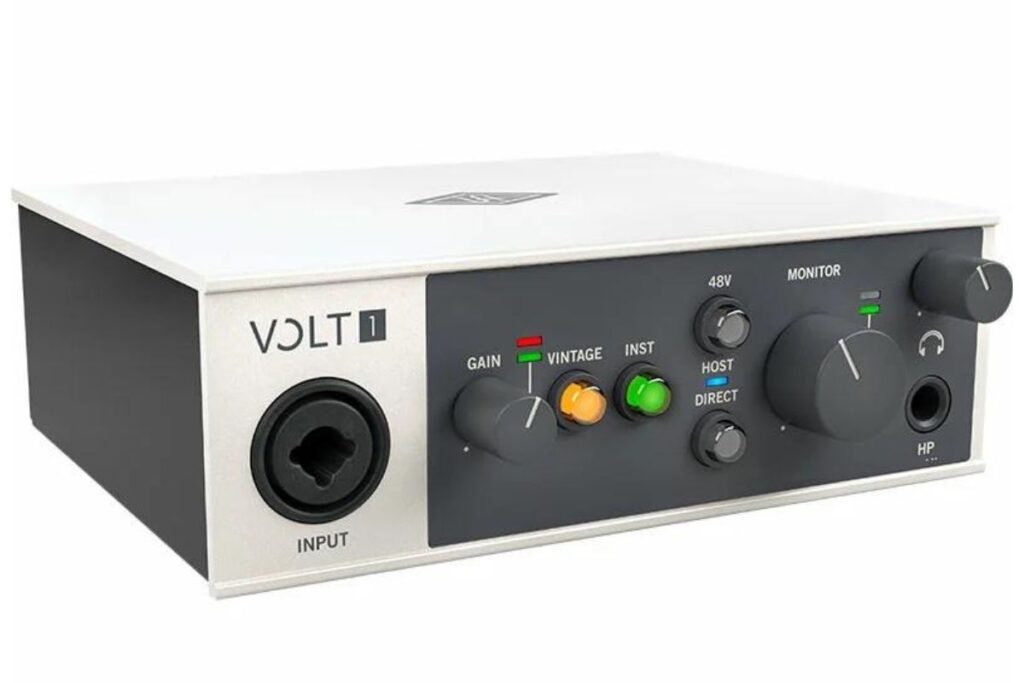
You have sound cards with available plug-ins that get you the effects that you desire. You have the Universal Audio Volt 1 (see photo below) with an unbeatable quality/price ratio. Compatible with Mac, PC, iPad and iPhone, one input, two outputs with great audio quality. At the same time, it offers a Vintage Mic Preamp mode, derived from the mythical UA 610 valve preamp, as well as a 12 UA-D plug-ins pack together with a musical software that leads the industry and the LUNA DAW. This sum of elements conforms a complete sound production pack that you can take on all kinds of projects with.
Microphone
If you’re just a beginner or you don’t possess too much experience using mics and your podcast studio does not enjoy professional acoustic isolation, a dynamic microphone will suit you best. Besides, it is more resistant and budget friendly.
On the other hand, if you plan on making a more significant investment, a condenser microphone will give you more professional sound, sharper recording and a wider range of sounds that you will be able to tinker with when editing. Here are some Universal Audio models you should have a look at:
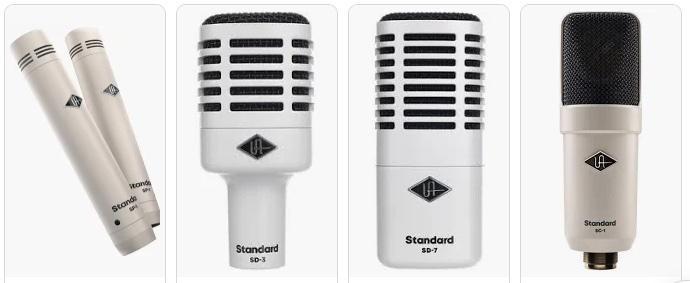
- UA SP-1 standard Pencil Mic: Small diaphragm condenser microphone, useful to record acoustic instruments and live performances.
- UA SD-3 Estándar Dynamic Mic: Compact cardioid dynamic microphone for instrument recording, especially drums.
- UA SD-5 Standard Dynamic Mic: Supercardioid dynamic microphone, useful for bass drums and bass guitar recordings.
- UA SC-1 Standard Condenser Mic: Large diaphragm condenser microphone, made for studio recording.
Studio Headphones
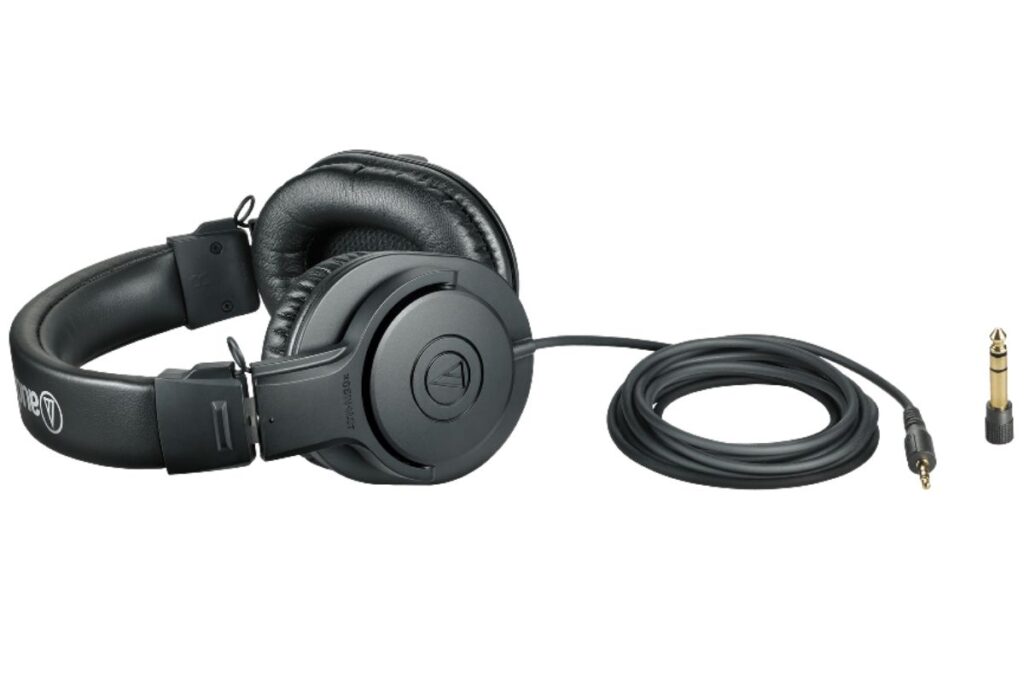
You are going to need headphones during the recording of an instrument or vocal, and these will allow you to appreciate all the details of it. They will also help the person in charge of recording by allowing them to listen to reference tracks such as drums, bass, guitar, etc. There’s a wide variety of studio headphones: open, semi-open or closed types, belonging to brands such as AKG, Beyer Dynamic, Audio Technica, Sennheiser, Adam Audio, etc. You will be able to compare features such as their sensitivity, bandwidth, whether or not the lines are replaceable, etc. Have a look at the Audio Technica ATH-M20x.
Studio Monitors
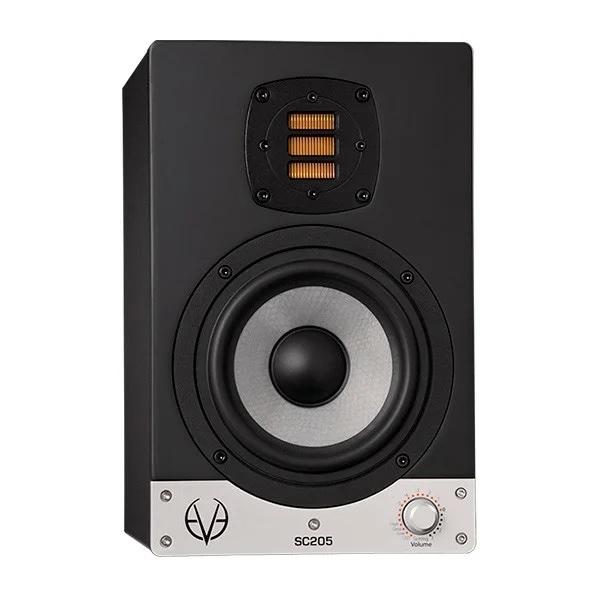
It is important for a home studio that the angle of the speaker is not too open in rooms of small dimensions, in which the effect of low frequencies is already more intense than in bigger spaces. Consider starting with 6-inch, in a room between 7 and 12 m2. Have a look at the EVE SC205 or EVE SC-207 monitors. As a comparative reference, the features of these monitors make them a great value for money acquisition.
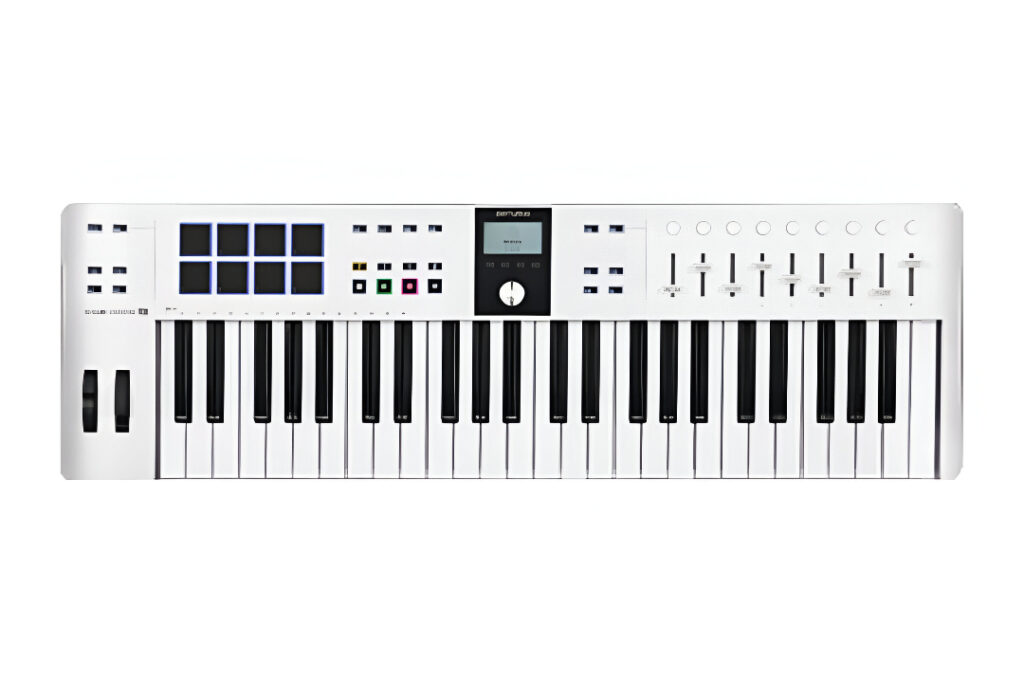
MIDI Controllers
MIDI is how we call the protocol with which a controller connects to our computer. There are keyboard-less controllers and others ranging between two and six octaves, which allow you to use the sounds of virtual instruments we have previously installed.
We can generate sounds, effects or modify the parameters of any DAW we are using in a very comprehensive way. Have a peek at the M-Audio, Akai or Korg in your local store.
Home studio acoustic conditioning
The goal of acoustic conditioning on a home studio is to simulate that, instead of within the walls of a room, you are in a slightly elevated point in the middle of a desert, where the sound reaches us then leaves us behind, never to come back. Having understood this, our aim is to cancel out the first reflections of sound in each of the surfaces of the room. Using the sweet spot as a reference, we are going to treat the front, right and left walls, as well as the ceiling.
Acoustic Treatment
To figure out where these first reflections are going to take place “almost” at the same time as the live sound from our audio monitors, we can use the help of a small mirror that someone else is going to move while you are sat on the sweet spot. When you see the speaker on the mirror, that is where sound reflections can be found. Have a read with this post about setting up your Auralex acoustic panels in which the mirror trick is explained, as well as how to place bass traps and diffusers. Bass traps go on vertical corners, first on front side of the room. If possible, add some in the rear side of it. Traps are never a bother!
For more information on this topic, access the post “How to make a studio out of your room”. There you will be able to read about the procedures of acoustic treatment on a home studio. If you decide to go for the most basic treatment for a home studio, you should consider starting with the Auralex kit Roominator Starter to add more equipment later in the future.
Setup placement
It is important in the buildup of your home studio that you place yourself at a 38% of the room’s length and have your audio monitors drawing the shape of an equilateral triangle, as you will have read previously on how to place the speakers in your home studio. There you will read all the details regarding the height they should be placed at and other bits of advice that will serve you well.
Audio calibration software
To calibrate your audio monitors, use the software sonarworks.com. This way, we will achieve an almost flat frequency response, being able to appreciate the real sound of our recording in the home studio and treat the deficiencies of our room and monitors more efficiently.
Tips to improve productivity in your home studio
In our experience, there are two aspects that increase the productivity of your home studio. The first one is sound insulation. This will allow the Studio to be used day and night, so it could be used by 2 or even 3 people each day.
The second aspect that will help you record and mix faster is to get a balanced acoustic conditioning. This way, you can record faster and the decisions during your mixes to sound outside the room the same way as they do inside, without having to correct levels during the mix.
Once proper acoustic conditioning is performed, if high levels remain in some frequencies, with peaks at 60 and 80 Hz, usually caused because two of the room’s wall lengths are equal or multiples of each other, they may be limited. Some sound cards incorporate a speaker calibration system, as is the case with the Universal Audio Apollo Twin X Gen2*.
* Requires the Apollo Monitor Correction Add-on and SoundID Reference licenses, available at sonarworks.com
For any doubts you may still have, do not hesitate to contact us and get personalized treatment.