Maybe it’s because the level of external noise assaults us, because the noise we create is excessive, or simply due to changes in building regulations. When you start looking for the best material for soundproofing, you’ll come across different opinions— some completely different from each other. We’re here to help.
Soundproofing material: what should I consider?
There is no single material that by itself provides sufficient insulation when facing a noise problem. If you read about the mass law, you’ll see that every time we double the mass of a wall, we manage to increase the overall sound insulation by 6 dB. To reach 20 dB of insulation, we’d need to increase the wall’s mass to 10 times its original value, which clearly indicates that we must opt for a solution involving two independent walls—combining an increase in mass with elasticity and absorption in the air gap.
These are the insulating materials we will discuss in this post to help you achieve your goals with a proper installation.
Types of soundproofing materials
We will list 5 materials that should be used in any type of acoustic insulation, in order starting from the wall to be insulated, with a sixth material that can be added, plus three additional types of acoustic insulation materials for more demanding projects.
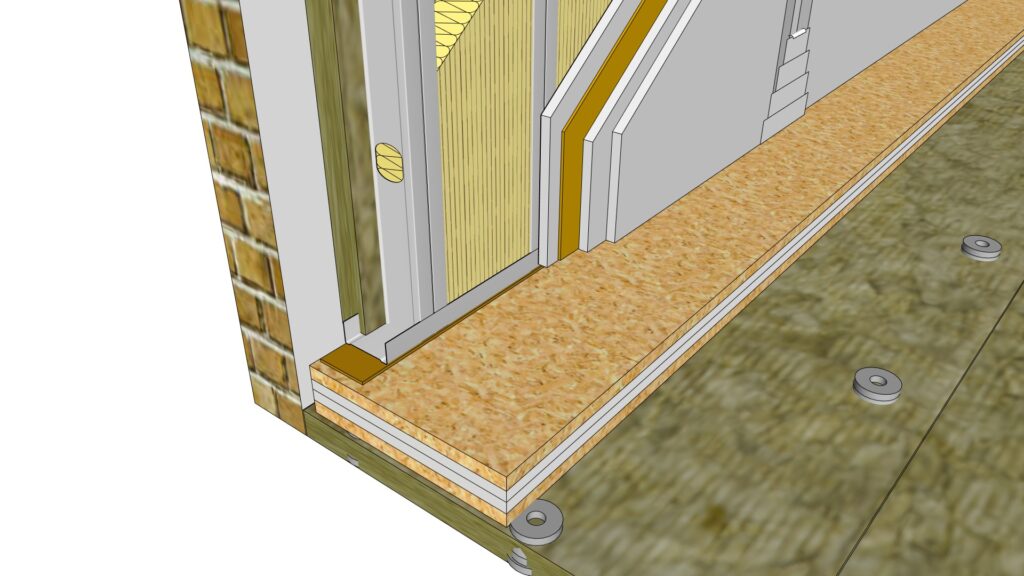
- Mineral Wool 1: Low density (25 to 35 kg/m³, such as Arena Apta or similar) with a thickness of 4 cm in the air gap we will leave between the existing wall and the new one.
- Load-Bearing Structure for Dry Partitioning: In our case, we use structures of 50 mm, 70 mm, or 90 mm depending on the goal and the wall height. Alternatively, you can use wooden battens of 50 x 50 mm or 50 x 70 mm if you have more economical access to this material.
- Mineral Wool 2: Installed within the aforementioned load-bearing structure, this one has a higher density—around 70 kg/m³, such as Alpharock E225 or similar. If we use a 70 mm structure, we install this mineral wool at 60 mm thick; if the structure is 50 mm, then this mineral wool should be 40 mm thick.
- Gypsum Plasterboards: Use two to three layers, depending on your objectives. The first layer can be replaced by as dense a wood as possible (for example, DMF) if you want to combine different types of materials, though it is recommended that the last layer is always gypsum plasterboard so that the joints can be perfectly sealed with tape and joint compound. The thicker each layer is, the better the insulation.
Note: We use three layers of 15 mm Placo PPH.
- Elastomeric Rubber or Self-Adhesive Acoustic Barrier: With a thickness of 2.5 mm and 5 kg/m² or 5 mm thick and 10 kg/m², this is installed between the load-bearing structures or wooden battens and the walls, ceiling, or floor—and also under the first layer of gypsum plasterboard or DMF. This improves the overall performance of the new wall. We also use it as an intermediate layer between the first layer of gypsum plasterboard (or DMF) and the second layer of gypsum plasterboard. This reduces the loss of insulation by up to 10 dB at high frequencies (this varies depending on the layers used and the room dimensions). We will see this loss or dip in Figure 5 above, marked as fc or Coincidence Frequency.
- Biclad Material, Flat Barrier Flex: A product that combines porous felt as an absorbent material with an elastomeric layer. We use it to reinforce the wall described in the previous sections by adhering it to the original wall before starting. This material is also used on ceilings and floors as acoustic reinforcement and to isolate noise from rainwater or greywater downpipes.
For more information about the mass law, consult this formative section from the University of Vigo. It helps to understand whether we can use single or double walls and the use of dampers.
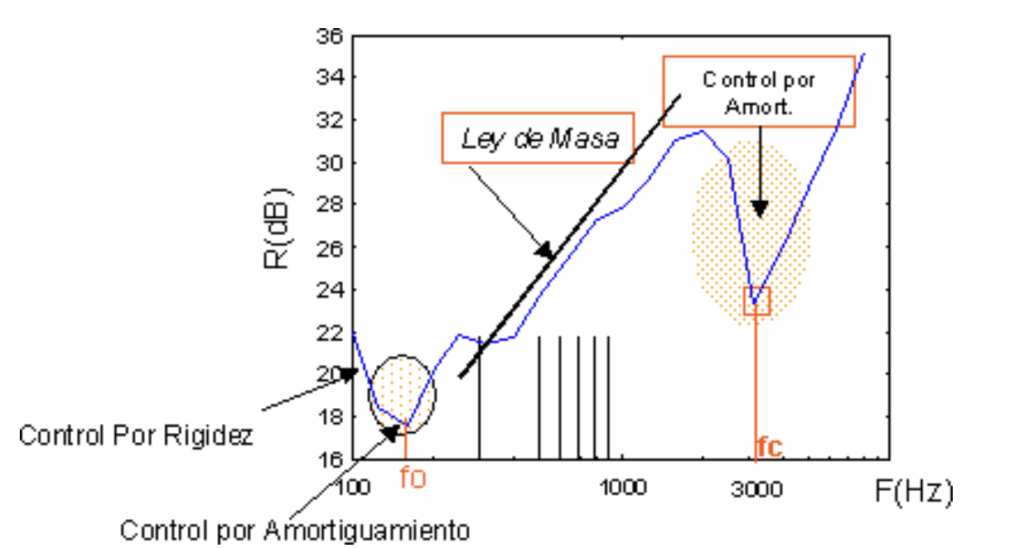
Figure 5: Airborne sound insulation under laboratory conditions of a 10 mm thick gypsum panel (M = 7.5 kg/m²). https://gcastro.webs.uvigo.es/PFC/Capitulo_dos_b.htm
Preliminary work
As a precaution, in the preliminary work we must consider sealing all the cracks and holes in switches—which will now transfer to the new wall—preferably with surface-mounted covers to avoid leaving a large gap in the acoustic insulation.
Execution by qualified operators
All these materials, when properly installed, can provide improved airborne noise insulation between two rooms with reinforced separation. However, it is important to hire qualified technicians to carry out the work, ensuring that everything is properly sealed after the preliminary work
Materials for advanced acoustic isolation
Unfortunately, not all noise problems—due to their intensity or origin—can be solved with a partial solution on a wall, ceiling, or floor.
For example, in a room dedicated to rehearsals or instrument recording, music production, a restaurant, nightclub, or any other activity that generates high levels of music or noise, a different approach is needed because sound enters or exits through the room’s lateral, upper, and lower sides.
Here, the presence of an engineer is indispensable; they should conduct a preliminary acoustic measurement to tailor the solution to ensure the objective is met. And, most importantly, a structural architect or qualified technician must ensure that the additional loads on the ceiling or floor will be supported by the building—or that a study is conducted for structural reinforcement.
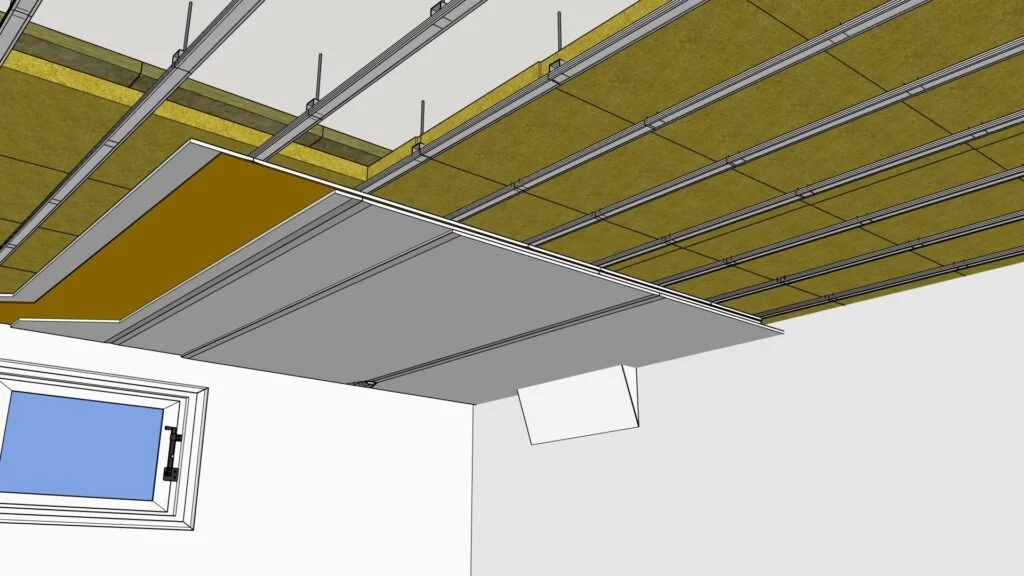
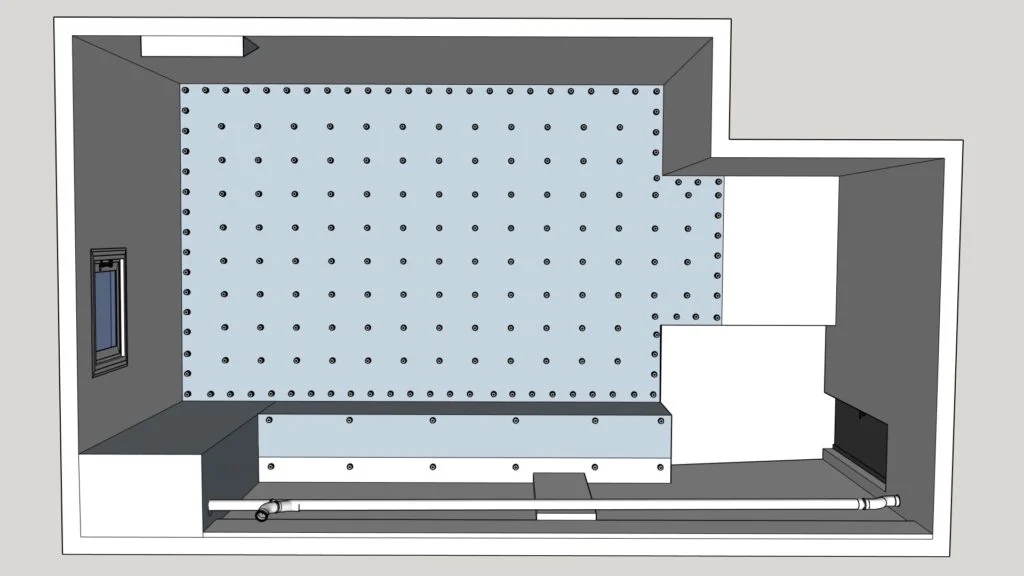
In this case, we will also use dampers on the ceiling and floor to achieve complete insulation (a “room within a room”):
- Ceiling Dampers: Install the dampers as specified by an engineer or qualified technician who will indicate the model and exact position of the ceiling dampers using metal plugs and threaded rods. Leave sufficient space to apply, on top of the metallic ceiling structure (TC47), a layer of the two mineral wools described above for the walls, followed by two or three layers of gypsum plasterboard as on the walls, with the Flat Barrier elastomeric rubber between the first and second layers. A safety gap of 3 cm should be left between the new ceiling and the four walls to avoid an acoustic bridge that would ruin the work. This ceiling system occupies a minimum total thickness of 17 cm.

- Floor Dampers: Install the dampers as specified by an engineer or qualified technician, indicating the model and exact position on a layer of mineral wool (see Mineral Wool 1), followed by a concrete screed or a dry structure consisting of 2 layers of 19 mm DMF with two layers of 15 mm gypsum plasterboard between them. Again, leave 3 cm of separation between the new floor and the four walls to avoid an acoustic bridge that would compromise the insulation. This type of floor generally occupies about 11 cm, not including the finishing layer (such as parquet or vinyl flooring).
Note: The use of floor dampers will result in a reduction of insulation that, as shown in Figure 5 as fo (resonance frequency), achieves a natural or resonance frequency lower than any of the frequencies that will be reproduced in the room.
- Acoustic Doors: When implementing this type of insulation, it is essential to use double acoustic doors, each with sound reduction values between 40 and 54 dB.
The load-bearing structure for the four walls will be installed between the new ceiling and the new floor, using double doors and double windows (if applicable), each with isolation values of 40, 45, 47, or 54 dB, depending on the requirements.
In this type of insulation, the preliminary work must also account for routing electrical installations for an internal sub-panel, pre-installing air conditioning, and updating with silencers for the air ducts depending on the room type and whether there are interior windows or whether the space is used privately or publicly.
Our Expert Recommendations
- Beware of solutions that only use rigid, absorbent, or elastic materials. On their own, without combining them, you will likely be disappointed with the results.
- Our recommendation is to carry out a partial insulation improvement on a wall or ceiling with the help of—or by hiring—a qualified technician. However, if you believe the problem won’t be solved by one of the partial solutions described above, please contact us for a preliminary evaluation before taking any action. At MasAcoustics, we are experts in custom acoustic solutions and will help you choose the best acoustic insulation for your needs.