The industry of podcasting is an ever growing one, since this is a simple, useful and smart method of communication. As of today, it is even on par with the audience of the radio industry. For anyone looking for a way into the world of podcasting, this is the blueprint to follow.
We are going to go over all the necessary elements prior to recording and editing audio and the different ways to optimize the acoustics of the room you’ll be podcasting in. Read on!
Why is it important to have a podcast studio?
Audio can be recorded from practically anywhere, of course. With an audio recording device like a computer or even a cellphone, we would be checking all the boxes to get a podcast running.
But if we want our product to have quality and be enticing to the audience, there are many other factors to consider, especially in terms of acoustic quality and comfort when doing the podcast. An adequate studio, the required microphones, the necessary gadgets, the use of an audio interface that meets our requirements and the audio editing in the end are elements that will make your podcast have a much more professional outlook to reach a bigger audience.
Key factors to consider before beginning
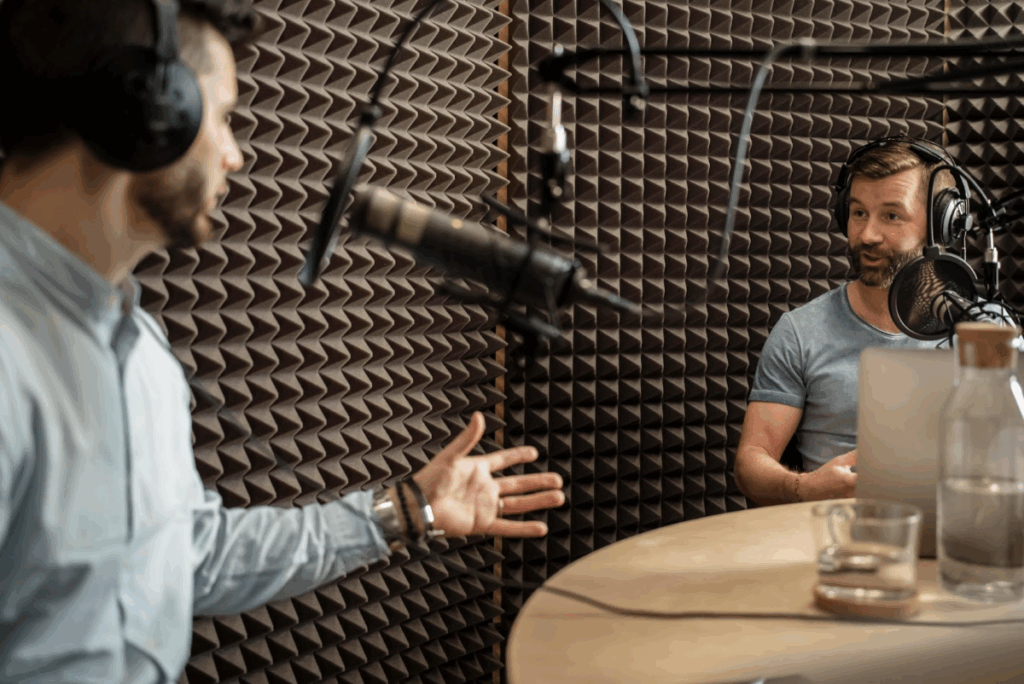
There is a list of previous requirements before hitting the record button that we must think of. One of the most important ones, of course, is the acoustics of the space we’re trying to record in: it is necessary to avoid external sounds sliding into the audio, such as street traffic, the rain, third party voices and an infinite list of etceteras that might interfere with your content.
Generally, a proper podcast studio comes already equipped with the necessary treatment to avoid external noises getting infiltrated and have the acoustics within the walls be as clean as possible. It is even likely that all the microphones have been set up and bring more than enough quality so that you don’t have to invest your own money to get the sound right. Nevertheless, you should at least be familiarized with these elements and the basic aspects of how microphones, cables, accessories and other kinds of sound recording devices work to be able to tell whether or not this suits your needs and offers audio of the quality you desire.
Technical equipment for a podcasting studio
Now that we’ve covered the studio part, we can split into 5 the categories of equipment that is necessary to carry on with the recording of a podcast.
Microphone
According to the characteristics of your studio’s acoustic conditioning and your previous knowledge about technical aspects, there are two sorts of microphones you should consider.
If you’re still a beginner, don’t have much experience in using microphones and your podcast studio doesn’t have professional sound-proofing treatment, a dynamic microphone will fit your needs, since it can withstand audio interferences with no problem and is more resistant. Besides, it is a more budget-friendly purchase.
On the other hand, if you’re planning to make a bigger investment, already have experience with microphones and your recording studio has gone through a more complete sound-proofing procedure, a condenser microphone will give you a more professional sound and a sharper recording that you will be able to tinker with in post production. Keep in mind that this makes external sounds get in more easily, so the technical requirements will be more demanding.
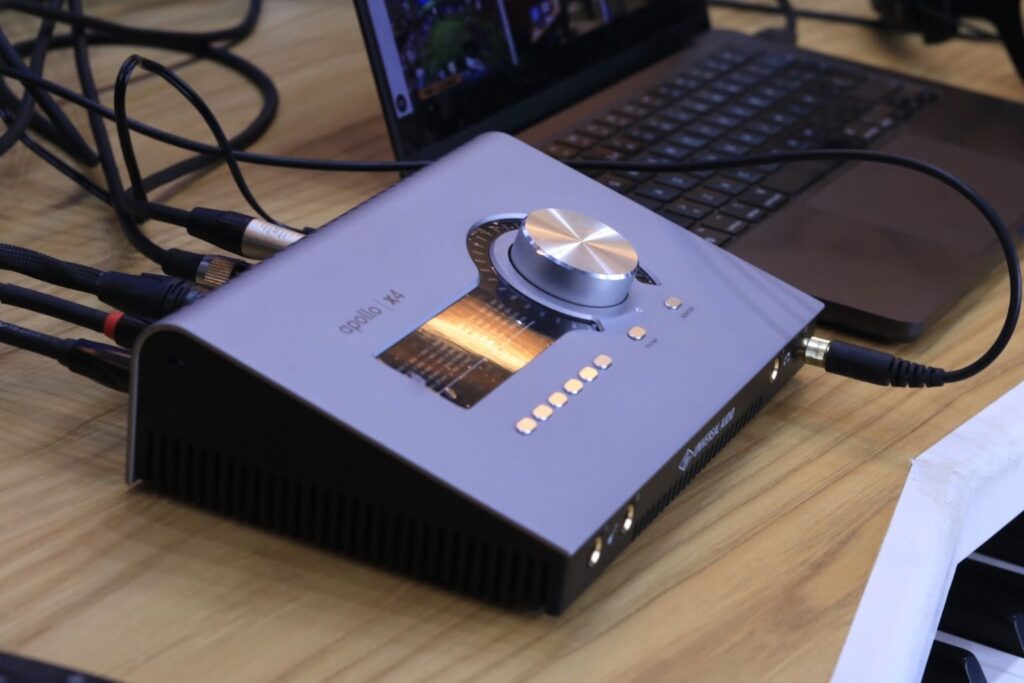
Audio interface
The audio interface is the element that will convert your analog or digital signal (depending on what instrument or device it is recorded from) to a format that the computer containing the DAW we are going to work with can ingest.
It can also work the other way around: when required, it converts the signal into analog so that we can listen to it on our headphones or speakers connected to said interface.
Monitoring headphones
The main reason why we want to wear headphones when recording is that the sound that our sound card produces will not be exactly the same as the one we listen to through our ears. Tonal variations, audio clarity, voice effects, gain differences from one mic to another, etc. Putting headphones on will help us get an idea of what it is that we are really recording and that will make its way to our DAW, which we will explain now.
Recording software (DAW)
The Digital Audio Workstation is the digital space in which all the sound editing, mixing and production will take place. Some of the most popular softwares are ProTools -which as of today is still the industry standard at a professional level-, Logic Pro X for Apple users, Reaper, Ableton or Audition, which is integrated in the Adobe software network. The one we recommend if you end up deciding to acquire a VOLT or Apollo audio interface is LUNA, Universal Audio’s free DAW, since it is optimized to work in a much more coordinated and smooth way with products of the same brand.
By using a DAW, we can work on audio tracks, splice them, move them, add sound effects, foleys or clean the noise that might have intruded. The most important part of the process is the project export, since once we are done editing we can extract an audio track in the desired format depending on the platform we want to upload and share our podcast on.
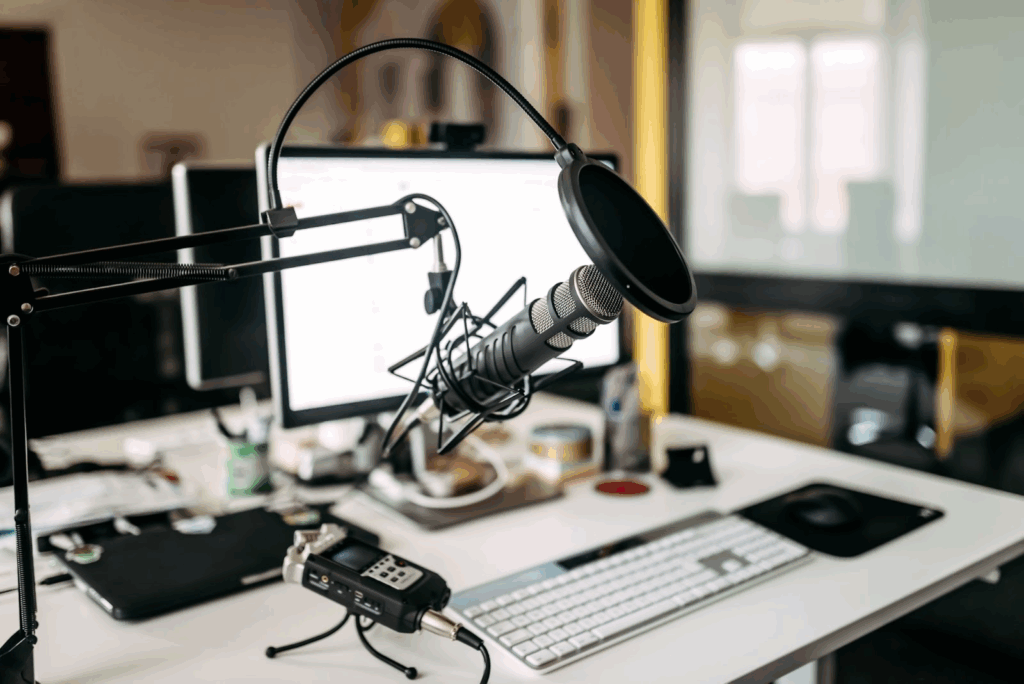
Anti-pop filters and foams
Microphone accessories are going to make our life easier to eliminate audial intermissions and also to keep our setup in top-notch state for a longer amount of time.
The anti-pop filter consists of a piece of fabric, most commonly nylon, that is set between the mic and the mouth of the person who is talking. There are consonants the pronunciation of which tends to make little explosive sounds, such as ‘k’, ‘p’, ‘d’ and ‘t’. That generates a little gust of air when saying the letter that may sneak into the recording and could cause ‘clipping’, which is a saturation of the recorded sound.
With that, we avoid losing that part of the recording that has been saturated and we also protect the microphone from saliva and the humidity in the room.
Foams have a more general purpose, they are placed around the microphone to avoid any sort of liquid or air sneak into the mic. They are more commonly found in devices used in exterior spaces, such as a boom microphone, but it is still a useful option in our studio.
Acoustic optimization for a podcast studio
Acoustic treatment
The ideal acoustic treatment for a podcast studio seeks to control the reflections of sound and reduce reverberation to achieve a clear, smooth and professional recording.
The most common solution, which we can see in practically every podcast studio with good acoustic foam panels, mineral fiber or polyester fiber. The setup of these panels aims to avoid having the voice bounce back from the walls towards us, so they are placed behind the microphone/s, on the ceiling and on the lateral walls at head level.

It may also occur that the ground, depending on the materials it was built with, produces vertical bounces of the sound. This happens, for example, with wooden or tile floors, although the solution to this is not in its source but on the ceiling, given that we can place materials there that absorb the sonic waves, thus preventing it from ever coming down.
If we want to go a bit further than that, we enter the territory of intermediate level acoustic treatment which will improve the results, but require a larger investment.
In order to improve the clarity of the voice or the musical instruments that are going to be played in the room, the best course of action is to place bass traps in the corners of the room that absorb part of the energy that the voice projects in a closed space.
If, on the other hand, our aim is to disperse the sound waves, we will place diffusers in the wall behind the microphone. The effect this has on the acoustics of the room is that it makes it sound less “artificial”.
Noise reduction
Not one bit less important than the acoustic treatment within the studio for the sounds inside of it is the soundproofing that prevents external sounds from making its way inside it and give us a bigger workload in the editing section.
The most effective measures to avoid noise filtering should be built within the studio itself. If it is a room that faces the street or with a lot of noise around it, it should have a double-glazing. Nevertheless, nothing works better than the ‘box in a box’ treatment, which has the best results.
Other actions we can successfully complete by ourselves include placing weather strips on doors and windows, adding a shock mount to the microphone that will minimize any unwanted impacts, placing rubber or acoustic foam mats under the electronic devices or, if we are able to, use a cardioid microphone that ignores the ambience sound, besides putting our mouths closer to them while speaking, leaving between 5 and 10 cm of distance between us and the mic.
Tips to improve the quality of your podcast
Keeping in mind all the recommendations we have already mentioned, it is now time to ponder about which ones are necessary for the space you plan on using. If you are already satisfied with the acoustics of the room, the next logical step is to set up your equipment in the best possible way and make sure that no external sounds ruin the acoustics that you have already achieved and you like.
If, on the contrary, you think the room needs isolation, that should be your priority because it precedes all the treatment of the studio and then you can think about what equipment to use and how to do so.
Something else you can do is take good care of your setup and avoid habits that may have a negative effect on its maintenance. An example as crucial as it is mundane is that power supply lines and the microphones’ XLRs get entangled and create interferences or static noises that make their way into the recorded audio.
For any other endeavors, do not hesitate to contact us and get individualized counseling.